Pages

Tuesday, April 1, 2014

Beautiful New Bookcase

     Almost 8 years ago when Matt and I moved in together he bought me a bookcase so I would have a place to put all my stuff in his apartment. Being poor we went to Ikea and I picked out a red 'Billy' bookcase for about $100. It worked great for awhile but Ikea furniture is not the most sturdy stuff in the world and although you can take it apart and move it, it does degrade a little bit every time. So after four moves and 8 years poor Billy was not doing so good. I'm sorry that I forgot to take a before picture but two of the shelves were busted and slanted while the back was coming off as well. It had never been particularly sturdy in the first place and the amount of stuff we had shoved in there was overloading the poor thing. To say we needed a new bookcase was an understatement. That thing could have killed one of our animals if they brushed up against it. So we went on a search.
     Finding a bookcase was harder than I thought it would be. We ruled out Ikea because we wanted something that would last and had a bit more character than mass produced particle board. So we did a google search for 'bookcases seattle'. Oddly enough not much came up. We live in the south end of the city which seems to be a wasteland for almost anything but food. (Columbia City neighborhood has a ton of great food, just FYI) One place did pop up though- Ballard Bookcase. Yup. Just as the name suggests it is a company that makes bookcases and is located in the Ballard neighborhood.
     Ok, fair enough, we decided to check it out. So on a rainy day -no, I mean, absolutely pouring down buckets of water from the heavens, we headed up to Ballard Bookcase. The shop was tucked away in the more industrial district but the showroom was pleasant, with friendly people and a good selection of bookcases to look at. They make a lot of gorgeous custom bookcases and there were a number of binders filled with photos of amazing things they had built. But all we really needed was a run-of-the-mill bookcase.
     We looked around at all the wonderful things they had and though Wow! Those are perfect but we can't afford that much! So we thanked the nice people and got back into the car. At which point we began to debate where to look next as waves of water washed over the car. We couldn't think of anywhere else to go. And it was getting close to lunch time. And the prices really weren't that bad since the bookcases were very well made. And we planned to keep this one until we died. So we went back inside.
     In the back was a tall bookcase with plenty of shelves and decorative moulding. It was beautiful solid wood and cost $470. I'm not sure what I was expecting to pay for a bookcase. Most of my previous furniture purchases have been from Ikea or Craigslist. After taxes the cost would be over $500. I think I paid less than that for all my other furniture combined! BUT, this bookcase was a quality piece. It had been hand crafted right here in Seattle and we planned to keep it for a very long time. When I thought about it in that light the price didn't seem so bad. If $10 dollars got me 8 years from a crappy Ikea bookcase then this quality real wood bookcase would last at least 40. That's only $12.50 a year! A bargain!
     So we snapped up the bookcase. We decided to come back in a few days when the weather was better and actually take it home. I was very excited when the guy put a little red "sold" sign on it. It was ours! No death by bookcase for our animals. But then there was a new dilemma. The wood was unfinished. We could stain it, paint it or wax it. Ultimately we decided to wax it using a special kind of wood wax with a hint of color.


     It took time but wasn't too difficult to do. The first day we did it the wax dried quickly and it was slow going. The next day we did it was warm and the wax went on like butter and the job was much after. The guy at Ballard Bookcase gave Matt in-depth instructions on how to apply the wax.


     In the above photo the top is stained while the bottom is not. It isn't a dramatic change which is why we picked this option. You get to see the grain of the wood but the color is warm and elegant. Doing the waxing was a bit of a dirty job though. I think I still have some dark spots where I got wax on my skin- and no, I don't mean my freckles.


     Here is the 'in progress' shot. You take out all the shelves and do them separately. The shelves are adjustable height which is nice for all our odd shaped books. Art and osteology are topics that demand irregular shaped books.


     And here is the beauty in its new home! All waxed and happy. We also managed to cull a few books from our collection so now there is room to buy more. Hurrah! The waxed wood goes nicely with our floors but is neutral enough to go with most decor when we move or change things up. So in the end I highly recommend Ballard Bookcase. I'm looking forward to a life time with this new addition to our home.

Thursday, March 13, 2014

Sprouts!

     Huzzah for spring! The daffodils are smiling and the cherry blossoms are dropping pink snow on the ground. We've even had some sunny days hitting the 60 degree mark in the last week. Even though there is a lot of work to be done inside the house, with the warm weather and breaks in the rain we are turning our attention outside. In the next couple weeks I will begin preparing the garden beds, pulling weeds and adding compost, but the garden is already growing inside.
    About a week ago I planted my first seed starters. It is as simple as getting an egg carton, filling it level with dirt and popping a seed in each section. And voila!

 
     There are many ways you can start seeds. Pinterest has an amazing amount of ideas if you search "starting seeds" or some variation of that. I use both the bottom and the top of the egg carton. The free-rage eggs I buy come in compostable egg cartons so if I want to I can just cut them apart and plant the sections directly into the ground when it is time.
     The top section in the photo is all tomatoes. As you saw in the last post about garden planning we like a lot of tomatoes. All of those are either Amish Paste or Mortgage lifters. These two varieties are larger and meatier which makes for better ketchup and tomato sauce. You can vaguely see some of the marks  I have made to indicate what  I planted where. DO THIS! It comes in handy later when you have forgotten what you planted where.
     In the bottom section I have (starting on the left) two yellow bell tomatoes, six cucumbers and four basil at the right end. I've never grown cucumber from seed before so it was exciting to see them pop up and how big they are compared to the tomato plants.


     Here is a closer shot of the cucumbers with some tomatoes in the background. Last year we bought three starters for roughly $1.25 each. Seeing as we got maybe 15 to 20 cucumbers out of that I think $3.75 was a good investment. But, for about $2 you can buy a packet of seeds and use them for years. If you've got some time and a little patience then growing your veggies from seed will can save you a good chunk of money. However, if you haven't planned ahead or want to try something new, then grabbing a starter or two at a garden store is well worth it.
     Later this week  I am going to do some onion starts and maybe some fava beans. But fava beans are too big to start in the egg cartons so I might do toilet paper tubes with the bottoms cut and folded to hold the soil in or splurge on a few biodegradable pots. Other veggies such as lettuce, kale, and carrots  I will just plant directly into the ground sometime in April or even later this month if it stays nice. Those plants grow fast and tolerate the cool spring temperatures we have here better than the tomatoes. I really baby the tomatoes. Kale on the other hand is particularly hearty. I still have some in the yard from last year that got snowed on and frozen and has bounced back. It is a little tough since it is older but it works for kale chips!
     Now is a good time to stop reading and start planting.  Go now!

Monday, February 24, 2014

Garden Planning

     It may seem a little early for garden planning but I assure you it is not. Deciding what, were and when you are going to plant this spring is the key to getting the most out of your space. Particularly if you are new to growing vegetables or plan to try new varieties. It may also be useful to think about how much something costs in the grocery store verses how much space it takes up in your garden. Broccoli and cauliflower, for instance, are pretty cheap but take up a square foot or more. I could use that space for a more expensive or hard to find vegetables such as butter lettuce or fava beans. The Cheap Vegetable Gardener has a great article that you can find here on the profitability of plants. Of course you should grow whatever you are going to eat but it is something to think about when planning your garden.
     My planning starts with looking back and what  I grew last year and what seeds  I still have on hand. I plot out where I am going to put the seeds I already have and then decide what else I can squeeze in or just must have. This winter we have really gotten into eating spaghetti and butternut squash. And last year we impulsively bought three cucumber starters and relished in cucumber sandwiches all summer. I also like to balance what we plan to eat fresh and what will be canned or dried for the winter. Half our garden (roughly 40 square feet) is dedicated to tomatoes. Matt makes a variety of ketchup flavors and I make pasta sauce and salsa. We can jars upon jars of tomatoey goodness to have long after the last of the plants have died. So I also have to plant things like basil and onion to go with the tomatoes. But we also eat massive amounts of tomatoes fresh. Cherry tomatoes are particularly wonderful in salads or for snacking right there in the garden.
     Once I know what I am going to plant and where I can easily figure out how many seeds I need to start. Each package will tell you how many plants you can grow in a certain area. Now if you have a really small plot or are not sure about a certain type of vegetable you can always get starters. One starter can cost as much as a packet of 100 seeds but if you just want to try it out or are a little late in starting your garden then by all means, grab what the local nursery has, shove it in the ground and enjoy.
   
How to plan a garden:

     I start my garden planning by looking at what seeds I already have. Some seeds I saved from the plants the previous years and others are leftover that I didn't use. I've never used an entire packet of seeds in one year. There are just too many of any one thing in a packet. Here is a photo of what  I've got at the moment.

The beans in the the upper left hand corner area fava beans that I saved from last year. It is roughly two pods worth. I'm excited to see if I did it right and they grow this year. The beans on the right are red runner beans. I'm going to cook some but also plant some. Beans seem to be the easiest things to save so that is why I am experimenting with them first. I already have kale, onion, sugar snap peas, radishes, carrots, arugula, cucumber, three kinds of tomatoes, spinach and basil. I still need to get butter lettuce, strawberries, spaghetti squash and butternut squash seeds. Then my garden plan will be complete.

     I graphed out roughly what I want to plant where. Each square on the paper represents roughly 6 inches so two squares equal a foot. The big section on the left is the main side yard. We plan to make some kind of trellis for the cucumbers to grow on and the tomatoes also need something that helps hold them up. In the middle of that section you will see a blank. I left that there in case we had more tomatoes than I budgeted room for or if we decide to randomly plant beets or something. It's good to have a plan but it is also good to be flexible.
    The side yard is in full sun but the front plots are shadier. The plot on top of the page gets more sun than the one below it so I can plant two cherry tomato plants in that one along with fava beans, carrots and radishes. Cherry tomatoes get ripe faster than the big meat tomatoes so they can deal with a little less sun.
   
     The lower garden plot in the front is very shady because it is blocked by the front porch. But it is still a great place to grow leafy greens. A whole bed of kale, arugula, spinach and butter leaf lettuce will keep us well stocked with nutritious salads. I am particularly looking forward to cooking the fava beans with ground turkey and spices and then wrapping it up with butter leaf lettuce.
     If you refer back to the photo of the complete garden you will see the lower right hand corner has one little plot and then a note. We have a tiny strip by the house which is where we put the beans since they can then grow up the poles we lean against the house. There is also that little note to myself about clearing a space on the back wall for squash. Because squash are vine plants and like to grow and spread along the ground I thought it would be a good idea to plant them in the back and have them grow over the stone wall. There are just weeds back there now but it shouldn't take too long to clear out a little spot for them. Then they can go nuts and won't encroach on anything else's space.
     Next week I plan to plant the first of my starters. Until then get going on your garden planning!

Saturday, November 2, 2013

Working on it

     I haven't been doing a lot of posts on This Ugly Old House Blog because I have been working a lot to get the money to do the remodeling to post about here. Isn't that always the way? Recently I took on a couple extra days of work so that we could put a new floor in the bathroom. Right now there are two types of flooring in there. The base layer is some pink linoleum like stuff that is glued down to the sub-flooring. I don't think we will be taking that off.

     The second/top layer is some crappy vinyl stuff that looks to be just thrown down in a hurry. They didn't even fix it down properly and is curling up all along one wall. It looks horrendous but I am even more scared of the pink below it!

     In the photo above you can see the vinyl at the bottom with the pink stuff to the right and where the pink stuff has broken off to the left there is the black adhesive. Pretty disgusting, right? The photo below is of the tile that I want or something similar to it.
     At $6.38 a sq ft the price comes out to roughly $245 and that includes taxes. Other supplies like adhesive and grout will be needed so I have budgeted $400 for the floor since we are doing the work ourselves. With a new floor we will also be putting in a new sink. I want a pedestal sink like this one: 

     This one from Lowe's runs $200 plus $50 to $100 for the faucets. I did see a vintage black pedestal sink at one of the reuse stores here in town which I think would look awesome. This is the sink we have now:
     Dated style and clunky looking. I think a nice pedestal sink will give the bathroom some class as well as make the space feel bigger. We plan to put storage cabinets to the right above the toilet so loosing the space below the sink won't be a problem. I also want a new medicine cabinet with more style as well as rip off that ugly wood paneling that is only on two small sections of the wall. Yuck!
     We have decided to go with a black and white for most everything so that nothing will clash. Then if we want a colorful curtain or towels things won't get too crazy. We are still in the planning phases and also want to have someone come and check the structural integrity of the floor to make sure it can handle the extra weight.
     With any home improvement project planning and making sure it is done right is key. We have been waiting over two years to do this project and I am more than ready to get started. I will keep you updated on our progress.


Tuesday, October 8, 2013

Budgets, Quotes and the Nitty Gritty of Home Repair

     When I was young I was not a planner. I was not very organized but I was spontaneous and fun. Although I still like to think that I am spontaneous and fun I have realized the value of being organized and thinking things through. Especially when it pertains to my house. With that in mind, this blog post is about the work you need to do before you take a sledge hammer to that wall you hate. The blight of unfinished home improvement projects can really take a toll on you.

Quotes
     I am not sure if I can stress enough the importance of getting a quote, if not multiple quotes. These are vital to your budgeting process and most places will do them for free. Think of it as a job interview. You are interviewing these people for the job of working on your house or providing you will a product. Interview multiple candidates. See who you like best and you think will do a good job. This person may be working inside your home for an extended period of time so you should at least feel comfortable having them around and they should treat you with respect and not be pushy or flaky.
     And if you have multiple quotes to choose from then you can see if the prices and duration of a project are all about the same or if some are much higher or lower than others. I would recommend three or four quotes so that you can get a good idea of the variability. Of course, if your house is flooding or some other imminent disaster is happening then have the first person you call fix it. That is not home improvement but disaster mitigation and you should have an emergency fund for that. But that is a whole other post.
     After you have your quotes then you can start working on your budget. Keep in mind that quotes are not just for labor. You also need to get quotes for home much materials cost which you plan to install yourself. Flooring, back splash tile, paint and whatnot along with tools you may need. For example, when we bought our lovely bamboo flooring we found out what the materials cost per square foot and figured that it would cost $1,000 for what we wanted. But when we went to purchase the materials we found out that there were vapor barriers, padding and glue that we also needed for installation which raised the total price to roughly $2,000. It was still a good price for what we got because we installed it ourselves and saved a lot on labor but there always seem to be hidden costs that you have to search out when getting quotes and putting a budget together.

Budget

     It may seem obvious but setting a budget and sticking to it is one of the most important things you can do when remodeling your home. Budgets are not glamorous or fun (unless you have a touch of OCD like me) however if you start a project without one then the costs can quickly spiral out of control and you will end up with only half a dream kitchen or going into debt. I recommend neither of these outcomes.
     Now, I am not saying that you have to allocate every penny but getting a general idea of what things cost. You can make a budget one of two ways. The first way is to figure out how much money you have to spend. Say you have $10,000 in savings to spruce up your kitchen. Your appliances are new but the floor is nasty and you could really use some new cabinetry. Knowing how much you have to spend and a rough idea of what you want to accomplish will allow you to get quotes for materials and possibly labor and see if they fit into your budget. Here is a special budget tip: Take 10-20% of your budget and put that aside. Do not allocate it towards anything but instead keep it handy incase some part of the process goes over budget. And if you don't spend it great! Money in the bank or at the very end (after everything else is close to being complete and not going over budget) you can splurge on whatever you were really hoping for.
     So here is an example rough budget of $10,000.

$1,000  This is the 10% that we set aside before doing anything else
$2,000  Fixing/removing existing flooring so that new flooring can be installed.
$2,000  Cost of new flooring. Installation will be done by homeowner
$5,000  Cost of new cabinetry and counter top. Homeowner does installation.

$9,000  Total cost budgeted for with $1,000 remaining for overages or last minute additions.

     So that is one way to set your budget. For most home owners I think this is the way to go because you know ahead of time how much money you have so you don't go crazy. Besides, most of us already know how much we have to spend on a project. But let's say you are doing to get a loan and don't know how much you need to ask for. That is when you would use this second method of budgeting. In the second method you find what you like, get quotes for it, add it all up, add 10-20% for overages and then you have the amount you should ask for. A bathroom remodeling budget could look something like this:

$1,000  new tile floor
$500     new tile around bath/shower area
$200     new low flow toilet
$100     eco friendly showerhead
$300     vanity
$300     sink and faucets
$200     medicine cabinet
$50       paint
$50       shower curtain
$2,700  total plus 10% overrage
$2,970 or roughly $3,000 total for a bathroom remodel. 

     I totally just pulled these numbers out of thin air to demonstrate how a budget might go. I feel that if the sky is the limit then you will easily reach the sky and then head for the stars so unless money is no object I think budgeting option number one is best for most people. And remember that things can be done in stages. Start from the ground up with new flooring and wait on replacing upper cabinets. Particularly when you are doing the work yourself breaking a big project into a number of smaller projects can be very helpful.
     Have you recently budgeted or gotten quotes for a home improvement project? Tell us how it when in the comment section.


Wednesday, September 25, 2013

40 Projects for Building Your Backyard Homestead book review

     Fall is here and soon it will be too nasty and dark outside to do many home improvement projects. However, now is an excellent time to start planning for next year! So with that in mind I have decided to do a book review. I hope to do these every two weeks or so on a new book that somehow relates to home improvement, gardening or decorating. This week it is the book 40 Projects for Building Your Backyard Homestead.

      I like this book. It has great ideas, good instructions and is an great price ($12.16 on Amazon). It has simple garden projects such as building a raised bed or inclined planter to basic fence construction, chicken coops, hydroponics and even installing solar panels. Pretty much the basics on everything you might need for your own backyard homestead!
     This book is a companion to the Backyard Homesteading: A Back-to-Basics Guide to Self-Sufficiency which is a good overview and introduction to the ideas and goals of homesteading. But to really get your creative juices flowing this book with over 40 projects is really the one. I highly recommend this book for anyone who needs a general manual for garden/homesteading related construction. At about $12 it is really better to have this book hanging around than to have to follow some instructions you find on Youtube.com. You can check out Amazon's preview of the book here.
      Have you read this book or own it? Let me, and everyone else, know what you think of it with a comment.

Thursday, September 12, 2013

End of Summer


     Although it is suppose to be in the 80's here today in Seattle I am still acutely aware that fall is closing in fast. Soon the rain will come and it will be time for hot cocoa, rain pants and making plans for next spring. But before we get ahead of ourselves let's look back at what we did this last year.

     Matt's big project this year was the french drain which he made in the backyard to keep water from seeping into the crawl space under the house. It seems to be working but the true test will be this winter. I think it will be a big help even if it does not stay completely dry down there. And since the french drain is finished with paving blocks it gives the walkway a finished look. If we didn't tell you that it had a functional drain underneath you would think that it was just a nice border that we added to spruce up the place. Too bad that really is the border from the relatively nice and maintained part of the yard into the wild unknown of the backyard...but we will work on that next year.
     You can see the nice square pavers going around the edge of the cement and then the wild yard beyond. We have big dreams for this area but I'll talk about that later. And no, I don't pose Banjo in all of my shots. He just thinks he is super cute and everything is about him so why would I be taking photos that don't include him?

     This year will also turned the entire side yard into a garden. You can read about that process here garden and here garden fencing. It was a lot of work but in the end it was well worth it. Because we were so focused on getting the garden going and keeping the plants alive we didn't get to a lot of the other projects that we need to do like finish the closet. But to date we have gotten roughly 50lbs of tomatoes, 10lbs of cucumbers, 1lbs of tomatillos, 1lb of onions and a smattering of radishes, carrots, lettuce, beets and basil so I am super excited for next year. And the season isn't even over yet!
      Here is the side garden with its cute wood and twine fence. We also put black bark chips down the side between the garden and the cement path. That is so we have ample space to roll the yard waste bin around and Banjo prefers running on the bark chips.
     And here is the garden in full swing. Tomatoes at the far end with lettuce down in the lower right hand corner. It really did amaze me how much food we could grow in such as small area. And having learned a few good life lessons we will be even more productive next year. For example, I am going to move the cucumbers to the front yard where they can grow onto the fence and not take up as much precious real estate. Then the tomatoes will be spread out more as it is really hard to get to the ones in the middle of that forest.
     We have also found that although we love cauliflower, broccoli and brussel sprouts they all just take up too much space and don't yield as much as we would like. Growing more fava beans, butter lettuce and strawberries might be more useful. We also want to extend the red runner beans to the entire side of the house and create a more effective trellising system. You can read all the gardening books and blogs in the world but actually trying it at home in your own space is the only way to know what will work for sure.
     The rest of this year was filled with small projects such as my video about how to make a living succulent centerpiece or tutorial on decorating with air plants. I am also trying to incorporate more informational and inspiring posts such as the ones on green roofs and grey water so that this blog will be interesting to more people. And with the front stairs breaking and costing $2,000 to fix, there went my bathroom remodel budget.
     So let us know what you think! Want more articles about environmental issues? Want tool reviews or more how-to videos? Add your voice to the comment section and let us know what interest you and then get out and soak of some much needed vitamin D. I hope you had a wonderful summer!

Tuesday, September 10, 2013

Green Roofs Part II Small Scale Ideas

     In the last post I talked about what a green roof is, the benefits and the different types. Now let's talk about making a green roof at home. If you have a larger scale project such as your entire roof to do I would suggest getting some help. Green roof designers/ permaculturist are popping up in big cities and can help you create a sustainable and beautiful green roof. http://www.greenroofs.com/ is a great resource to start. And if you want to be more DIY about it they also have info on buying green roof systems that you can put in yourself. Unfortunately right now, time and money are a constraint for me so we won't be jumping on the ladder and laying sod down just yet. However, I have compiled some fun and interesting small sample projects that could easily facilitate your jumping on the green roof bandwagon.
    
     This photo is of a super cute garage that was turned into a flower garden. If you don't want to jump right into covering your house with a green roof you could start with  a much smaller garage. My husband found an old photo of our house on-line in which the roof of our garage was originally flat. Maybe it should be flat again... 

     Already have a flat roof but don't want to do all the work of putting the growing medium directly on top? You can still make a cute and functional roof top garden. Are those beehives I see up there too? Phenomenal!
     Is a garage still to big? How about a bike shelter?

     The structural support for the green roof was done over a preexisting metal container. Take out the metal container, and maybe make it a little bigger, and this could be the covering for a patio or tool shed.
     Bike shed still too big? Here are a few more small scale ideas that you could implement in a weekend.
   What lucky dogs! I think Banjo could really use one of these.

      And then there is this super cute chicken coop. You could potentially grow food for the chickens on top of their coop. How useful would that be? And it would help keep your little chickies cooler in the summer and warmer in the winter.
     And the smallest idea of the day is for this little green roof birdhouse. This would be a great Sunday afternoon project to familiarizes yourself with the layers involved in a green roof. And then you invite birds into your garden too.
     I don't know where these garbage cans are located because the blog I found the picture on is in french but no matter what the language these are still pretty cool. Usually trash cans are an eyesore but no one would complain about these. So think outside the box if you want to try a tiny green roof project. I am sure if you look hard enough you can find something to do. And if you do make a green roof leave a comment so we can feature your creation. 
     Finally, here are a few more pictures of green roofs that I just find cute, beautiful or inspiring. I hope this post has gotten you interested in the benefits of green roofs and thinking about projects that you could do. 

      I would be more than happy to have this in my backyard. Do you think those are small swimming pools or koi ponds?
      Can't green your roof? Green a wall! This is a great use of space and looks gorgeous. Smaller versions of this with succulents are really popular right now but this almost looks like it is filled with different kinds of lettuce. Add some herbs and you have a wall garden.
     Apparently green roof buses could be coming to NYC. This may be going a little too far but might just work. I am keeping my eye on this one.
     And finally, my favorite photo- goats grazing on a green roof. Talk about permaculture! I wonder how they get up there...

Thursday, September 5, 2013

Green Roofs part 1 What is a green roof?

     The other day I was climbing on a ladder in my backyard to get plums to make jam when I looked over at my roof and thought Could I make that a green roof? The main pitch of the roof is too steep but the laundry/storage room that was built onto the back has much less pitch to it. This is a shot of my roof.

     The back section of my roof looks promising as a green roof but it will never be as cool as this school in Singapore.
 Above: Nanyang Technological University School of Art and Design in Singapore
Below: Meera Sky Garden House, Singapore

     Currently, most green roofs in the US are on commercial buildings, government or university buildings or apartment complexes. Green roofs on a single family house are just not that common. There may be a number of factor which contribute to this fact but let's first look at what a green roof is.
What is a "Green Roof"?
     I use to call any roof with plants on it a 'green roof'. Even if it was more of a roof patio with planters. But an actual green roof has to have the growing medium (aka dirt) directly on the roof and not separately contained in planters. Roof top patios and gardens are super awesome but they are not considered green roofs, aka living roofs, eco-roofs or vegetated roofs.
     There are two kinds of green roofs. Intensive and extensive. Intensive green roofs have a deeper growing medium and can grow more substantial plants such as trees and shrubs. Those cool pictures you see of rooftop gardens in Brooklyn where the restaurant grows all its own vegetables are examples of intensive green roofs. The goal for these roofs are usually the plants themselves which are grown for food or to create a beautiful space.
      This is a photo of Higher Ground Farm, a rooftop garden in Boston (http://higher-ground-farm.com/).

     Extensive green roofs have much less growing medium, about 2-6 inches usually. The goal of this type of roof is to provide insulation for the building as well as reduce storm water runoff. The plants are usually native grasses or other plants that can thrive with little to no care and have shallow roots. The traditional sod roof houses in Norway are extensive green roofs.
      This is a house in Iceland with a traditional sod roof. You can learn more about the history of green roofs here http://www.greenroofs.com/Greenroofs101/history.htm.

     Even though the aim of intensive vs extensive green roofs are slightly different both have many of the same benefits. Besides being pretty the benefits include:
     *Management of rainwater- A green roof will trap and hold a significant amount of rainwater which will keep it from draining into gutters and reducing the risk of flooding.
     *Cooling and energy conservation- All that extra dirt and material adds insulation to a roof keeping a house warmer in the winter. In the summer the plants absorb the sun instead of a traditional black shingle roof which just heats up in the sun.
     *Increase biodiversity/ providing wildlife habitat- This all depends on what you plant on your green roof but it could be easily geared toward creative an inviting environment for birds and other wildlife.
     *Noise insulation- More of an issue for in the big city but it does offer some soundproofing.
     *Waste water treatment- Nature is great at filtering water and a green roof is no exception. The rainwater that does drain off a green roof will be slightly filtered of some contaminates. Also, you could spray your green roof with gray water from your house and have the roof filter out the larger particulates.
     *Food production- Of course a roof top garden will make food for us but a flowering extensive roof can make food for other animals. A roof full of clovers and a bee hive make a perfect pair.

     A green roof is not super complicated but it does take some good planning and a strong back.

     So there are 7 layers in a green roof. The structural support can be the roof itself if it is strong enough. Most are not because they are not designed to have all this other stuff on it but roofs in more northern climates with heavy snow fall might have enough integrity to just throw a green roof on. Consult an engineer before you go crazy.
     The roofing membrane is what usually goes under roofing shingles and is waterproof. A basic protective layer. The protective membrane/root barrier is a but stronger and keeps the waterproof layer from getting damaged. The insulation gives even more protection to the lower layers and helps insulate the house. The drainage, aeration and water storage layer is very important because it does exactly what is says. Because the growing medium can be very thin there is not a lot of space for excess water to accumulate. This layer will help the soil drain so the plants don't get water logged but will also retain some water for later use.
     Finally we have the growing medium which can be rich thick soil for growing vegetables or a light thin sandy layer good for hardy plants which cover in a thin layer. Know what plants you want to grow first and that will dictate your growing medium as well as how much structural support you need.
     You might be able to alter this setup a little bit. I doubt the traditional sod roofs of Norway have the fancy insulation or drainage layers. And the cactus covered roofs of the southwest probably don't need the insulation. So consult a permaculture expert in your area to see what you need for the type of green roof you want.
     Feeling excited about making a green roof? My next post will be about implementing a green roof as well as design ideas and small projects that anyone can do.
  

Monday, September 2, 2013

Succulent Planting Part I

      My last post was about making a hanging terrarium with air plants but there are other ways to bring interesting greenery into your living space. Succulent terrariums that sit on a table or shelf are also very popular. I have dubbed the one I make in this video a "living center piece" because it is a bit bigger than just one or two plants in a pot that sit on a shelf. And thought the video I also refer to it as a terrarium which is not exactly correct. To be a terrarium the whole think would have to be encased, usually in glass. I could put a glass cover over my finished piece and then it would become a terrarium. But since I left the top open I think calling it a living center piece is more appropriate.

Succulant Planting Part 2


    Here is the second video about making a living center piece with succulent plants. I am new to the whole being-on-camera thing so don't judge me too harshly.

Thursday, August 29, 2013

Air Plants

     Air plants are all the rage right now. They are strange little plants that don't need soil and very little water. I liken them to the sea monkeys of house plants. They need very little care and look interesting enough to be conversation starters. Although I did somehow kill my sea monkeys in college, I have high hopes for the longevity of these plants.
      During my birthday weekend Matt took me to The Palm Room in the  Ballard neighborhood (http://www.thepalmroom.com/) and picked out these three air plants. I wish I had written down the names of the three different kinds but I didn't think about it. And since they don't have roots and pots and therefore don't have those little plastic tags saying what it is I am never know. Or I guess I could google it.

      At the Palm Room we also give some pretty black and gray stones to go at the bottom of the glass orb. These are not necessary but they make it look nice. The geode is half of what we got when we went to Agate Designs in downtown Seattle (http://www.agatedesigns.com/). For about $10 we got to pick a rock from the bin and they cracked it open for us. Just a fun silly thing to do and it ended up looking nice in my new terrarium. 
    The hanging glass orb came from Camelion Design (http://www.cameliondesign.com/) just down the block from the Palm Room. After hanging the glass orb above the kitchen table all we had to do was put the rocks, geode and plants in. Super easy and very stylish. The biggest cost was the orb at about $15. Plus the plants and gravel for about $20. All total $35 for a custom air plant hanging terrarium. Of course you could do a smaller one or a couple little ones which would look cool. Since the plants don't need soil there are many possibilities for unusual places and containers for them.
     The lady at the Palm Room recommended that I spritz them with water once a week. I use our orchid spritzer, take them out of the orb and wet them, then shake off the excess and pop them back in. Not hard at all.
Please little air plants, live longer than the sea monkeys.

Wednesday, August 28, 2013

Red Runner Beans

    This year is the first that we have grown red runner beans. I picked them specifically because they are pretty. I'm not completely sure why they are called red when they are actually purple and black. Maybe because the flowers are red? Either way, they take longer to mature than I thought they would. About a month and a half ago we had a lot of big green pods that looked great and Matt begged me to pull them off and make something out of them. I was very disappointed when I opened the pods only to find very tiny pink beans that looked nothing like the ones I planted.
     Although the pink beans are cute I knew they were not ready to eat and all the big green pods I harvested only yielded a pitifully small handful of beans. So after that sad harvest I kind of forgot about them for a little while. Besides, the cucumbers and tomatoes were giving us plenty to eat. But today I took a second look at those beans. Some of the pods had started to turn yellow and dry up. 
      Can you see that the one in my hand is more yellow than the green one still on the vine. And that one is not even completely yellow. The beans that came out of that greenish yellow pod look like this: 
     Closer but not quite there yet. I have to wait until the pods are completely yellow and dry before you get beans like this:
    Now those are some gorgeous beans! The plan is now to let all the beans dry in their pods and to then shell and save them for the winter...or a full dinner. And the moral of this story? Don't let your husband talk you into picking something that you don't think is ripe yet! Or at the very least pick one and look inside before you pick them all and find out they are not mature.

Sunday, August 25, 2013

Fun at ReUse Stores

     When remodeling a home we tend to just run over to Lowe's or Home Depot and pick from whatever they have for the job. It is all the same, generic, boring stuff as everyone else is putting in their house. But if you want to be unique and environmentally friendly then reuse or building salvage stores are the place to be. We are lucky enough to have three in the Seattle area and Matt and I have been to them all. They all have interesting and useful things but it can take a bit of digging to find them. But who doesn't love digging through junk?
     Today we went to Second Use is the SODO district, http://www.seconduse.com/ which is where all of the pictures below were taken but there is also Earthwise, http://www.earthwise-salvage.com/ again in the SODO district and the RE store http://re-store.org/ in ballard. There is also a Habitat for Humanity store I hear but I have never been there. All of these places have interesting things at decent prices. Here are some of the treasures I found today.

     Building salvage stores don't usually have the newest, top of the line merchandise. Instead, they have an eclectic mix from who-knows-where. If you need something very specific then they probably don't have it. If you could take one of the granite slabs shown in the picture above and have it cut down to the size you need then a world of possibilities opens up.
     Need a top for you toilet? How about one in yellow? Yup, we've got that!
     Got a use for a cool old heater or two? I think getting two of these and putting a piece of wood on top for a table would be super cool.
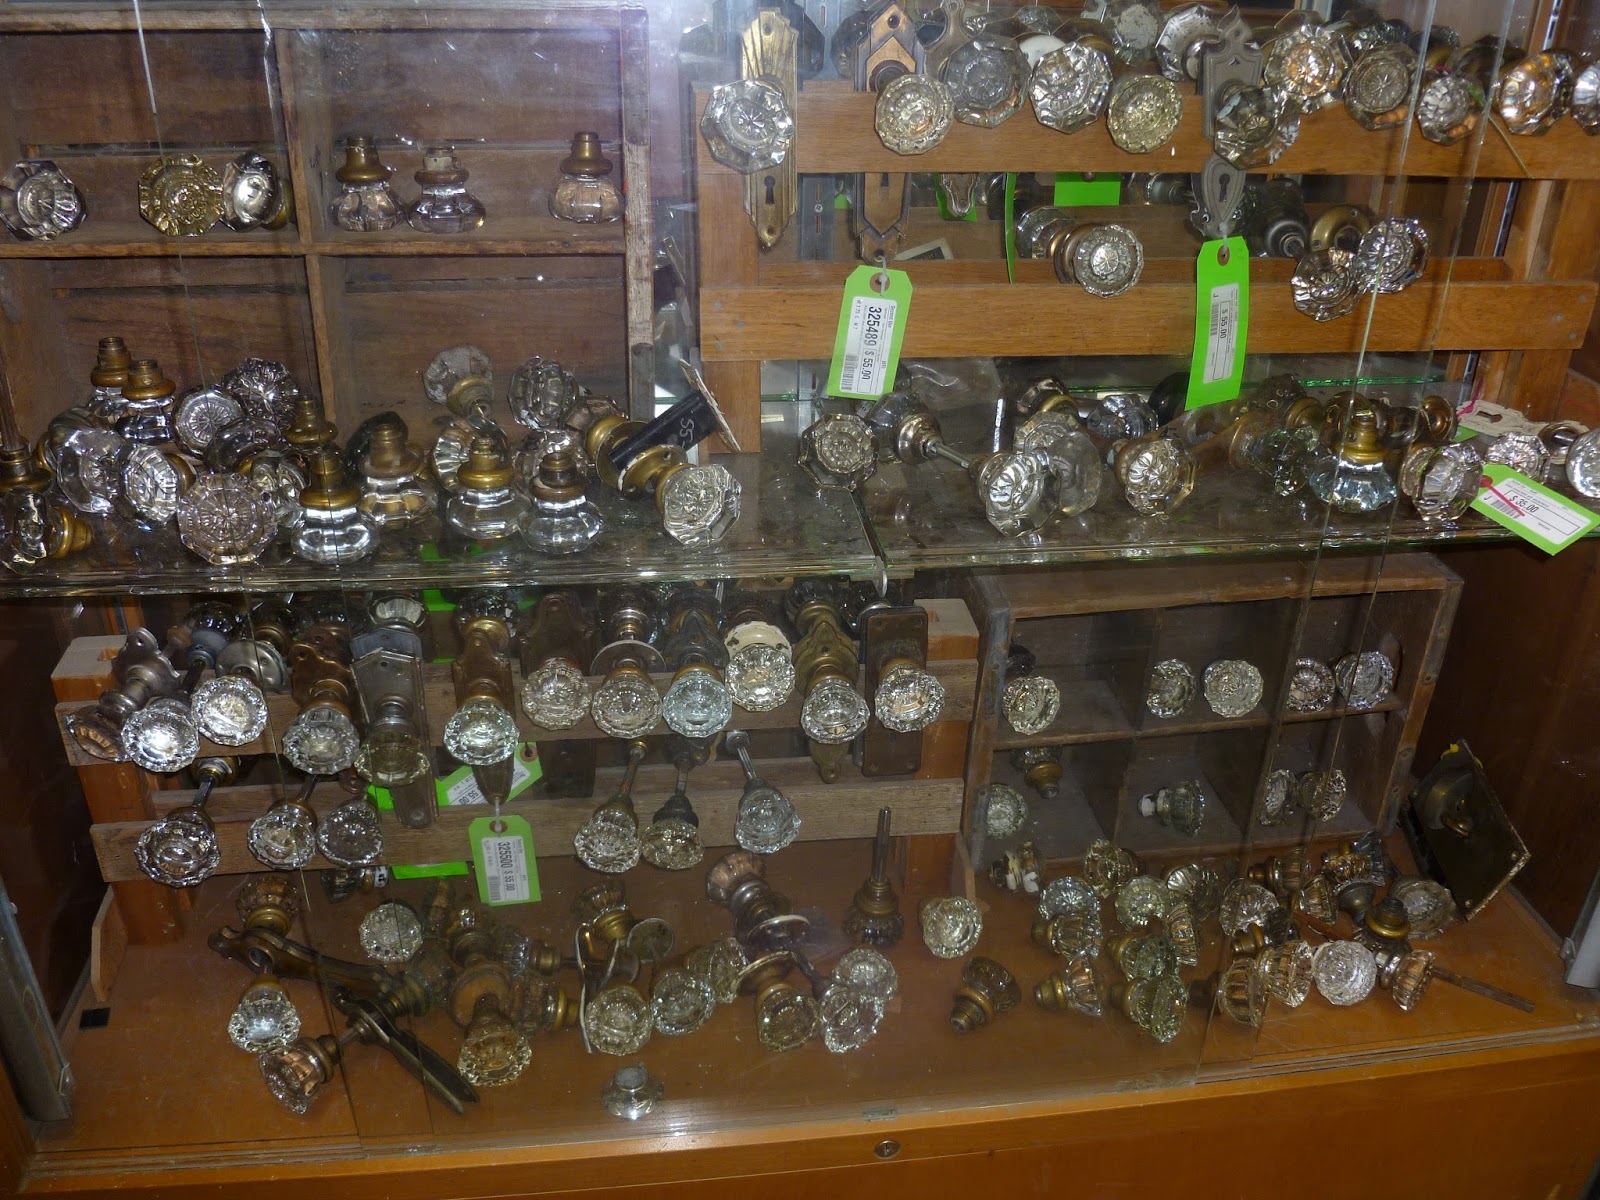
      I think I counted three full rows of doors. We got one for our bedroom and a cool black door nob to go along with it. We had to cut it down but it looks great. And much cheaper than buying a new one.
     Vintage glass door nob anyone? Like a hoard of giant diamonds.
      I tried talking Matt into putting these tiles of a chubby kid riding a snail in the bathroom but he wasn't interested. You will certainly not find these at Lowe's!
    Or this one either. Not sure I would want more than one but it could be a cool trivet for hot dishes to be set on. Be creative with what you find.
      If these lockers were not $225 I would put them by my front door. One locker for me, one for Matt and one for the dog's stuff.
      A rather rowdy looking bunch of sinks and toilets. It is like a history of plumbing in this place.
     My personal favorite of the trip. I can't describe very well what we mean when we say we want "French Metro" style for our bathroom but this sink is sooooooo french metro. I secretly want go back, buy it and then hide it from Matt until it is time to redo our bathroom because I know it won't be there when I need it. That is the main thing about these places. There is only one of whatever you see because it came out of some old house so if you like it snatch it up quick!
    I encourage you to take a trip to a building salvage place on your next day off and just root around in all their cool stuff. You might just find the perfect corner sink that you have been looking for.